
A dorm gallery wall does not require nails or permanent holes to look intentional. You can create one with removable hanging methods, lightweight artwork, and layouts designed around the pieces you want to display. The key is to choose a nail-free method that suits the artwork and then plan the arrangement before attaching anything to the wall.

1. Create a Removable Grid of Framed Prints
A framed grid is one of the easiest ways to make a dorm gallery wall look organized without using nails. Choose several lightweight frames with the same dimensions or a few complementary sizes, then arrange them in straight rows.
Removable picture-hanging strips can hold compatible lightweight frames while keeping the arrangement free from nail holes. Before mounting them, create paper templates the same size as the frames and temporarily place the templates on the wall. This lets you establish the exact spacing between each piece.
For a classic grid, keep the horizontal and vertical gaps consistent. A two-by-three arrangement can work above a desk, while a wider three-by-three grid can fill a larger section of wall above a bed.
The artwork does not have to be identical. You can use different photographs, illustrations, or prints while keeping the frames consistent. The matching frame structure is what makes the collection read as one gallery wall.

2. Arrange Unframed Prints Into a Layered Dorm Collage
If you do not want to buy several frames, create the gallery wall from lightweight prints, photographs, postcards, and other paper artwork. This makes it possible to build a larger-looking display without putting heavy objects on the wall.
Start with one or two larger prints and position smaller pieces around them. Instead of spacing every item evenly, allow a few pieces to sit closer together or overlap slightly. This creates the layered appearance of a collage while keeping the display connected to the gallery-wall concept.
Use a removable mounting method appropriate for the paper pieces and the dorm wall surface. Keep the heaviest items out of the arrangement if the chosen mounting method is intended only for lightweight artwork.
A paper gallery is also easy to refresh. You can replace a photograph, postcard, or print without redesigning the entire wall, making it practical for a dorm where your interests or memories may change throughout the school year.
For a more finished appearance, repeat one visual element across the collection. Several prints might share the same accent color, photography style, subject, or border treatment.

3. Turn Fabric-Covered Canvases Into a Nail-Free Gallery
Fabric-covered canvases can turn a dorm gallery wall into a more textured display while keeping the artwork lightweight. Instead of relying entirely on framed prints, cover several lightweight canvases with fabrics that coordinate with the rest of the room.
Choose two or three related patterns rather than making every canvas completely different. For example, floral, striped, and small geometric fabrics can work together when they share a similar color palette.
Arrange the canvases in a compact grid if you prefer structure, or offset them slightly to create a more relaxed composition. Because the fabric itself provides pattern, you can keep the rest of the artwork relatively simple.
Before mounting the canvases, check their individual weight and select a removable hanging method that is specifically appropriate for that weight and the wall surface. Follow the product’s application and weight instructions rather than assuming that any adhesive strip can support any canvas.
This approach is particularly useful when you want your nail-free gallery wall to contribute color and texture rather than simply display photographs.
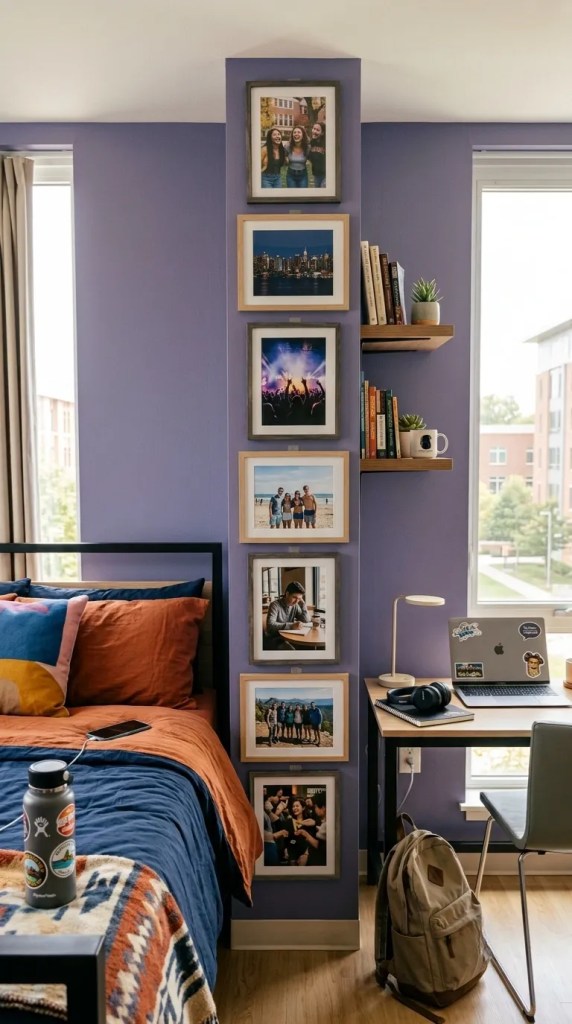
4. Build a Narrow Vertical Photo Gallery
A dorm wall does not always provide enough horizontal space for a conventional gallery. A narrow vertical photo gallery solves that problem by turning a slim section of wall into the display area.
Choose a series of lightweight photographs or small framed prints and stack them in a single vertical column. You can use identical sizes for a clean appearance or alternate portrait and landscape pieces while maintaining a consistent central alignment.
This format works well beside a dorm bed, desk, closet, or doorway because it uses height instead of spreading across the wall. It can also fill an otherwise awkward strip of empty wall without competing with larger furniture.
For the cleanest result, decide on the vertical line before mounting anything. Paper templates can help you see whether the column is positioned correctly and whether the gaps between the photographs feel balanced.
If the photographs have different colors or subjects, use similar frame finishes or repeated borders to make the vertical display feel like one gallery rather than a stack of unrelated pictures.
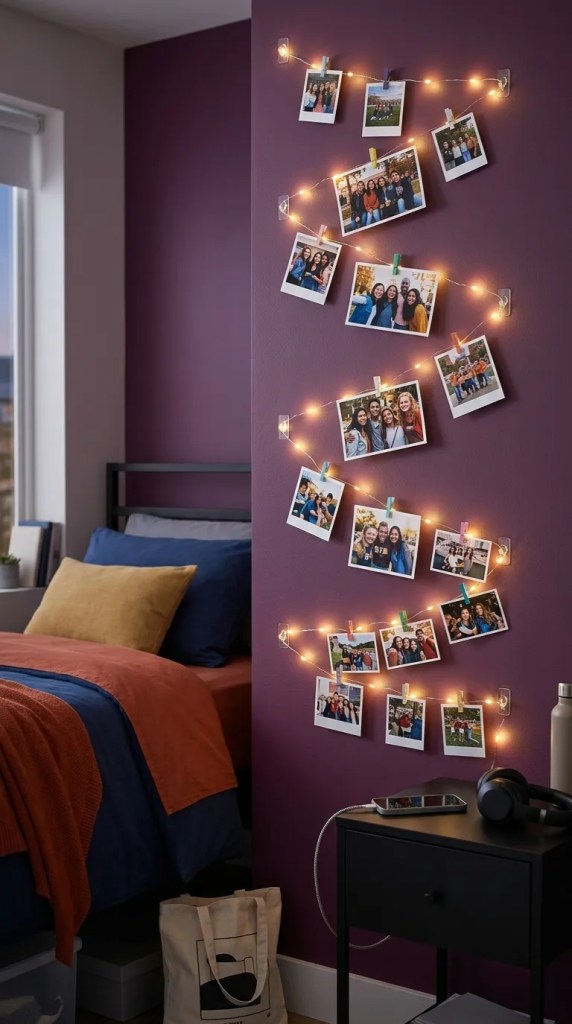
5. Make a String-Light Photo Gallery Without Nails
A string-light photo gallery combines a photograph display with dorm-friendly ambient lighting. Instead of mounting individual frames across the wall, use a strand of lightweight lights as the visual path for the gallery.
Position the strand with removable adhesive hooks or another suitable mounting method. A loose vertical line, gentle zigzag, or soft curve can create the structure of the display.
Attach lightweight photographs with small clips along the strand. Keep the photographs light enough that you are not placing excessive weight on the light strand or its mounting points.
You can make the arrangement more deliberate by placing larger photographs near the center and smaller ones toward the ends. Alternatively, use photographs of similar sizes at regular intervals for a cleaner look.
This design works particularly well beside a bed because the photographs remain decorative during the day while the lights become part of the gallery’s appearance at night.

6. Build the Gallery Around an Adhesive Display Ledge
A removable display ledge can provide a different way to create a dorm gallery wall without attaching every piece of artwork directly to the wall. The ledge acts as the base of the composition, while lightweight frames and prints are layered on top.
Place a larger print toward the back of the ledge and lean smaller photographs or artwork in front of it. Vary the heights and orientations so the display has depth rather than looking like a straight row.
You can also create a visual connection between the ledge and the wall above it by adding one or two lightweight prints directly above the display. Keep these pieces visually related to the artwork on the ledge so the entire arrangement reads as one gallery.
The advantage of this format is flexibility. You can change the photographs or prints without repeatedly removing wall-mounted adhesive. That makes it practical if you want to update your dorm gallery during the semester.
Check the ledge’s weight limit and the suitability of its mounting method for your dorm wall before adding artwork.

7. Create an Asymmetrical Collected Gallery
An asymmetrical gallery is useful when your artwork does not come in matching sizes. Instead of forcing different pieces into a grid, arrange them as a deliberately uneven collection.
Start with the largest or most visually important piece. Place it slightly away from the center, then build outward with smaller photographs, prints, and lightweight frames.
The goal is not to make every gap identical. Instead, balance the visual weight across the entire arrangement. If one side contains a large dark frame, for example, smaller darker or more visually substantial pieces on the opposite side can help balance it.
Paper templates are particularly useful for this style. Move the templates around until the overall silhouette feels intentional before attaching the actual artwork.
Keep some consistency within the variety. Repeating a frame finish, accent color, photograph style, or artwork theme can make an assortment of pieces feel like a cohesive dorm gallery wall.

8. Surround One Large Centerpiece With Smaller Artwork
A large centerpiece can give a dorm gallery wall a strong focal point while allowing you to use fewer pieces overall. Choose one lightweight artwork or print as the main visual anchor and arrange smaller pieces around it.
A botanical print, favorite photograph, illustration, or typography print can serve as the centerpiece. Then add smaller photographs or prints along its sides and above or below it.
Keep the supporting pieces close enough to the centerpiece that they read as part of the same gallery. Avoid spreading them so far apart that the arrangement begins to look like separate wall decorations.
You can create balance by pairing different shapes. For example, a large vertical centerpiece can be surrounded by smaller horizontal photographs, while a large horizontal print can be supported by a narrow vertical frame on each side.
Choose a mounting method based on the weight of every individual piece. The centerpiece should not automatically be treated as suitable for the same adhesive product as the smaller artwork.
Planning a Nail-Free Dorm Gallery Wall Before Mounting It
Once you know which gallery-wall format you want, plan the complete arrangement before putting anything on the wall. This prevents unnecessary repositioning and helps you see whether the design works with the available dorm space.
Measure the Available Wall Space
Measure the section of wall you actually intend to use rather than assuming the entire wall is available. Consider the desk, bed, shelves, closet, windows, and doors around it.
The gallery should relate to the furniture beneath it. A gallery above a desk, for example, usually looks more intentional when its width works with the desk rather than extending far beyond it.
Test the Layout on the Floor
Lay every artwork piece on the floor and experiment with the arrangement before mounting it.
Try moving the largest pieces first, then fill the surrounding spaces with smaller artwork. Once you have a layout you like, take a photograph so you have a reference when transferring it to the wall.
Use Paper Templates for Precise Placement
Cut paper templates to match the dimensions of your frames or artwork. Temporarily attach them to the wall while you test the arrangement.
Templates are especially useful for a framed grid because they make spacing and alignment easy to check. They are equally helpful for an asymmetrical gallery because you can move the pieces around without repeatedly disturbing the actual mounting products.
Match the Mounting Method to the Artwork
Check the weight of each frame, canvas, ledge, or other display element before choosing a mounting method. The appropriate product depends on both the item’s weight and the wall surface.
Follow the specific manufacturer’s instructions for surface preparation, application, weight limits, and removal. Do not assume that all adhesive products have the same capacity or work on every dorm wall.
It is also important to check your residence’s decorating rules before mounting anything. A removable product may still be unsuitable for a particular surface or restricted by your dorm’s policies.
Frequently Asked Questions
Can you make a gallery wall without nails?
Yes. A gallery wall can use removable picture-hanging products, suitable adhesive mounting methods, lightweight prints, display ledges, or other temporary display systems instead of nails. The right option depends on the artwork and wall surface.
What is the best way to hang a gallery wall in a dorm?
The best method depends on the artwork’s weight, the dorm wall surface, and the residence’s decorating rules. For compatible lightweight framed artwork, removable picture-hanging products can be one option. Lightweight prints and display ledges provide other approaches.
Can you use Command Strips for a dorm gallery wall?
Command Strips can be suitable for compatible artwork when the particular product is appropriate for the item’s weight and the wall surface. Always follow the manufacturer’s stated weight limits and application instructions.
How do you hang framed pictures in a dorm without nails?
Choose a removable hanging method designed for the frame’s weight and appropriate for the wall surface. Plan the arrangement first, mark the positions, prepare the surface as instructed, and mount each frame according to the product directions.
How do you arrange a dorm gallery wall?
Start with the available wall space and the artwork you want to display. A grid, vertical photo column, asymmetrical collection, centerpiece arrangement, or layered print collage can all work. Test the complete composition before mounting it.
How do you create a damage-conscious gallery wall in a dorm?
Use lightweight artwork where appropriate, choose mounting products that match the artwork and wall surface, and follow the manufacturer’s instructions for application and removal. Also check the dorm’s specific decorating restrictions before beginning.


