
Figuring out how to organize a dorm room with a roommate requires a physical strategy. Moving two people into a standard 12-by-15-foot space means every inch of the floor plan matters. Setting up a functional shared dorm room layout relies on strict spatial boundaries and clever furniture placement to prevent belongings from spilling over into shared zones. The goal is to create a highly structured environment where both individuals have dedicated storage and enough room to breathe.

Coordinate a Symmetrical Bed Layout to Open Up the Center Floor
Placing two twin XL beds parallel against opposite walls creates a distinct visual walkway right down the middle. This parallel configuration maximizes usable floor space in the center, giving you and your roommate a neutral zone to walk through without stepping on each other’s belongings. Leaving a gap of at least three to four feet between the bed frames prevents the area from feeling cramped.
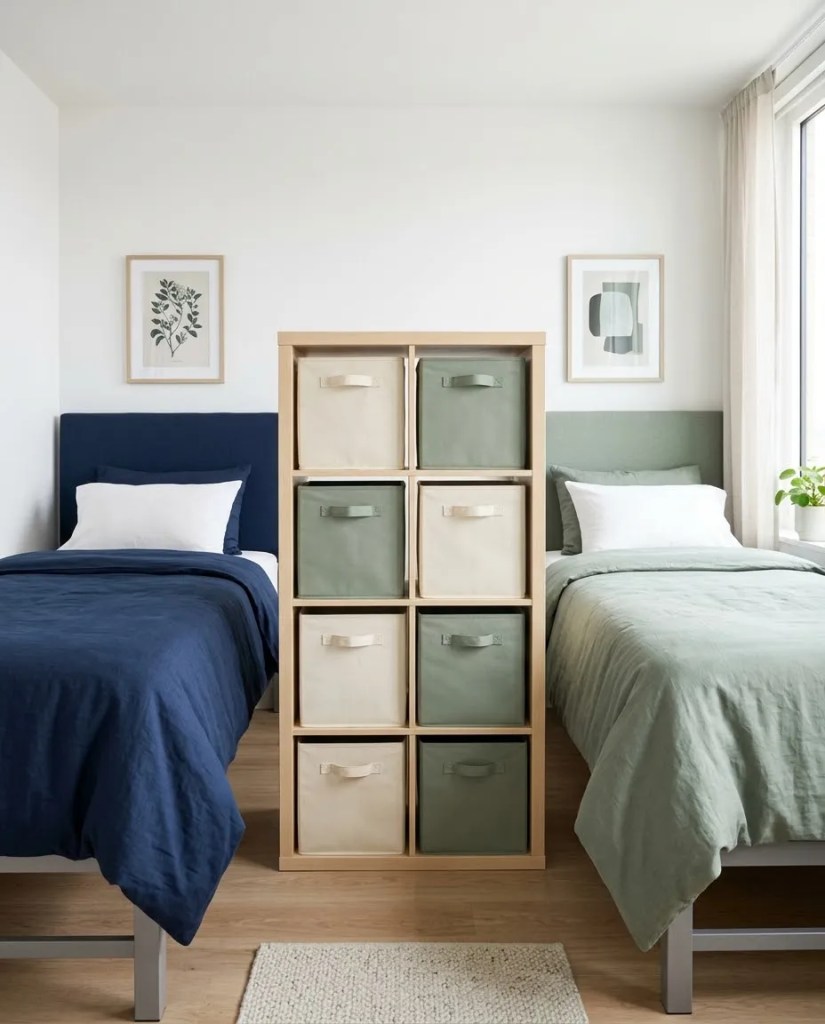
Build a Headboard Room Divider to Establish Private Sleeping Zones
You can carve out privacy by using furniture as physical barriers. Positioning a freestanding 2×4 cube shelving unit between the heads of the beds acts as an instant room divider. This setup blocks direct line of sight while you are sleeping and provides dual-sided shelving. You can fill the cubbies with fabric storage totes, allowing one person to access the bottom rows and the other to use the top rows.

Split the Closet Down the Middle with Hanging Cubby Systems
Most college housing units come with a single wide closet that two people must share. Hanging a sturdy six-shelf fabric organizer directly in the center establishes a firm boundary line between your clothes and your roommate’s garments. This organizer serves a dual purpose by marking territory and providing folded storage for bulky items like sweaters or thick denim.

Select a Unified Color Palette to Minimize Visual Clutter
Two drastically different aesthetic choices crammed into one small area will make the room look messy even when it is completely clean. Coordinating a color scheme minimizes visual clutter and creates a cohesive look. You do not need to buy matching bedding. Instead, agree on a neutral base color for large items like rugs and curtains, then pick individual accent colors that blend well together, such as navy blue and sage green.

Loft Both Beds to House Individual Desks Underneath
Taking advantage of vertical space becomes a necessity when you need to fit two beds, two dressers, and two desks in one room. Raising both bed frames to the maximum height opens up the entire footprint underneath. A standard 36-inch-wide student desk fits comfortably beneath a lofted twin XL bed. Pushing the desks under the beds takes them out of the main walkway and instantly creates individual study nooks.

Set Up a Shared Rolling Cart for Coffee Makers and Snacks
Appliances take up valuable real estate on built-in surfaces. A three-tier metal rolling cart acts as a multi-functional furniture piece for communal items. You can dedicate the top tier to a shared coffee maker, the middle basket to mugs and utensils, and the bottom shelf to dry snacks. Having the unit on caster wheels means you can roll the entire station into a corner or out of the way when you need extra floor space for packing or cleaning.

Use Tension Rods and Curtains to Hide Open Wardrobe Chaos
Many older dorms feature built-in wardrobes without doors, leaving hanging clothes exposed. Installing a heavy-duty tension rod across the frame opening allows you to hang a thick curtain panel over the contents. Closing the curtain instantly removes visual clutter from the room and establishes a cleaner backdrop for the space. Choose a blackout curtain fabric to add a solid block of color while hiding the internal storage layout completely.

Position a Double-Sided Bookshelf Between the Beds
A backless bookshelf placed perpendicular to the wall works as a highly functional partition. Because the shelves are open on both sides, you and your roommate can access stored items from your respective beds. Assign the bottom three shelves to heavier items like textbooks or shoe boxes, and reserve the top two for lightweight decor or small electronics. This arrangement maximizes vertical space without blocking the room’s overhead lighting.

Assign Over-the-Door Organizers for Separate Bathroom Caddies
The back of the main entry door or a closet door provides prime vertical storage for daily essentials. Hanging two narrow over-the-door organizers side-by-side gives each person a dedicated spot for shower caddies, toiletries, and hair tools. Keeping these wet or bulky items tucked away in hanging pockets clears up valuable desk surface area for studying and safeguards electronics from accidental spills.

Lift Bed Frames with Risers for Identical Mirrored Storage Bins
If lofting your bed entirely is out of the question, you can still gain crucial inches underneath by adding a set of 6-inch or 8-inch bed risers to the legs. This lift creates enough clearance to slide in large plastic stackable bins or rolling under-bed drawers. Using identical opaque bins for both sides of the room keeps the floor space looking uniform and intentional, maintaining a cohesive aesthetic across the shared layout.

Mount Peel-and-Stick Wall Shelves for Dedicated Floating Nightstands
Traditional nightstands consume too much floor space in a tight dual layout. Mounting adhesive, damage-free wall shelves right next to your mattress provides a sturdy spot for a phone charger, a glass of water, and a reading lamp. Installing these ledges at roughly 24 to 30 inches above the mattress height puts your nighttime essentials within arm’s reach while keeping the floor completely clear for walking.

Create a Central Drop Zone by the Door for Keys and Lanyards
Small items like student IDs, keys, and sunglasses quickly cause surface clutter when dumped on the nearest desk. Setting up a compact drop zone immediately inside the door stops this habit at the source. You can mount a narrow adhesive hook rail with at least four pegs, assigning two hooks per person. Placing a small, floating acrylic tray right below the hooks offers a designated catch-all for wallets and chapstick the moment you walk inside.
Frequently Asked Questions
How do you arrange a dorm room with two beds?
The most efficient arrangement for two beds in a standard dorm is a parallel setup against opposite walls. This layout leaves a clear central walkway and distinctly divides the room into two equal halves. If floor space is extremely tight, lofting both beds to maximum height and placing desks or dressers underneath is the most practical solution.
How do you divide a shared dorm room visually?
You can divide a room visually by positioning a backless bookshelf or a low cube storage unit between the beds. This creates a physical barrier without blocking natural light. Using a tension rod and curtain between two distinct areas or setting up a symmetrical furniture layout also establishes clear boundaries.
What are the best storage solutions for shared dorms?
The best storage solutions utilize vertical space. Over-the-door organizers are crucial for holding bathroom caddies or shoes behind closet and entry doors. Adding bed risers to lift frames creates vital space for large, sliding storage totes. Hanging fabric cubbies inside a shared closet is the easiest way to partition folded clothing.
How do you organize a dorm closet with a roommate?
Organize a shared closet by splitting it directly down the middle. Hang a vertical shelf organizer in the dead center to serve as a physical dividing line. Assign one half to each person for hanging clothes, and use the hanging shelves for shared items or folded bulky garments.
How do you decorate a dorm room when you have different styles?
When styles clash, agree on a neutral foundation for large pieces like the main rug and window curtains. Once the base is set, stick to a unified color palette of two to three coordinating accent colors. You can express individual styles through small items on your dedicated floating shelves or desk area without disrupting the overall cohesion of the room.


